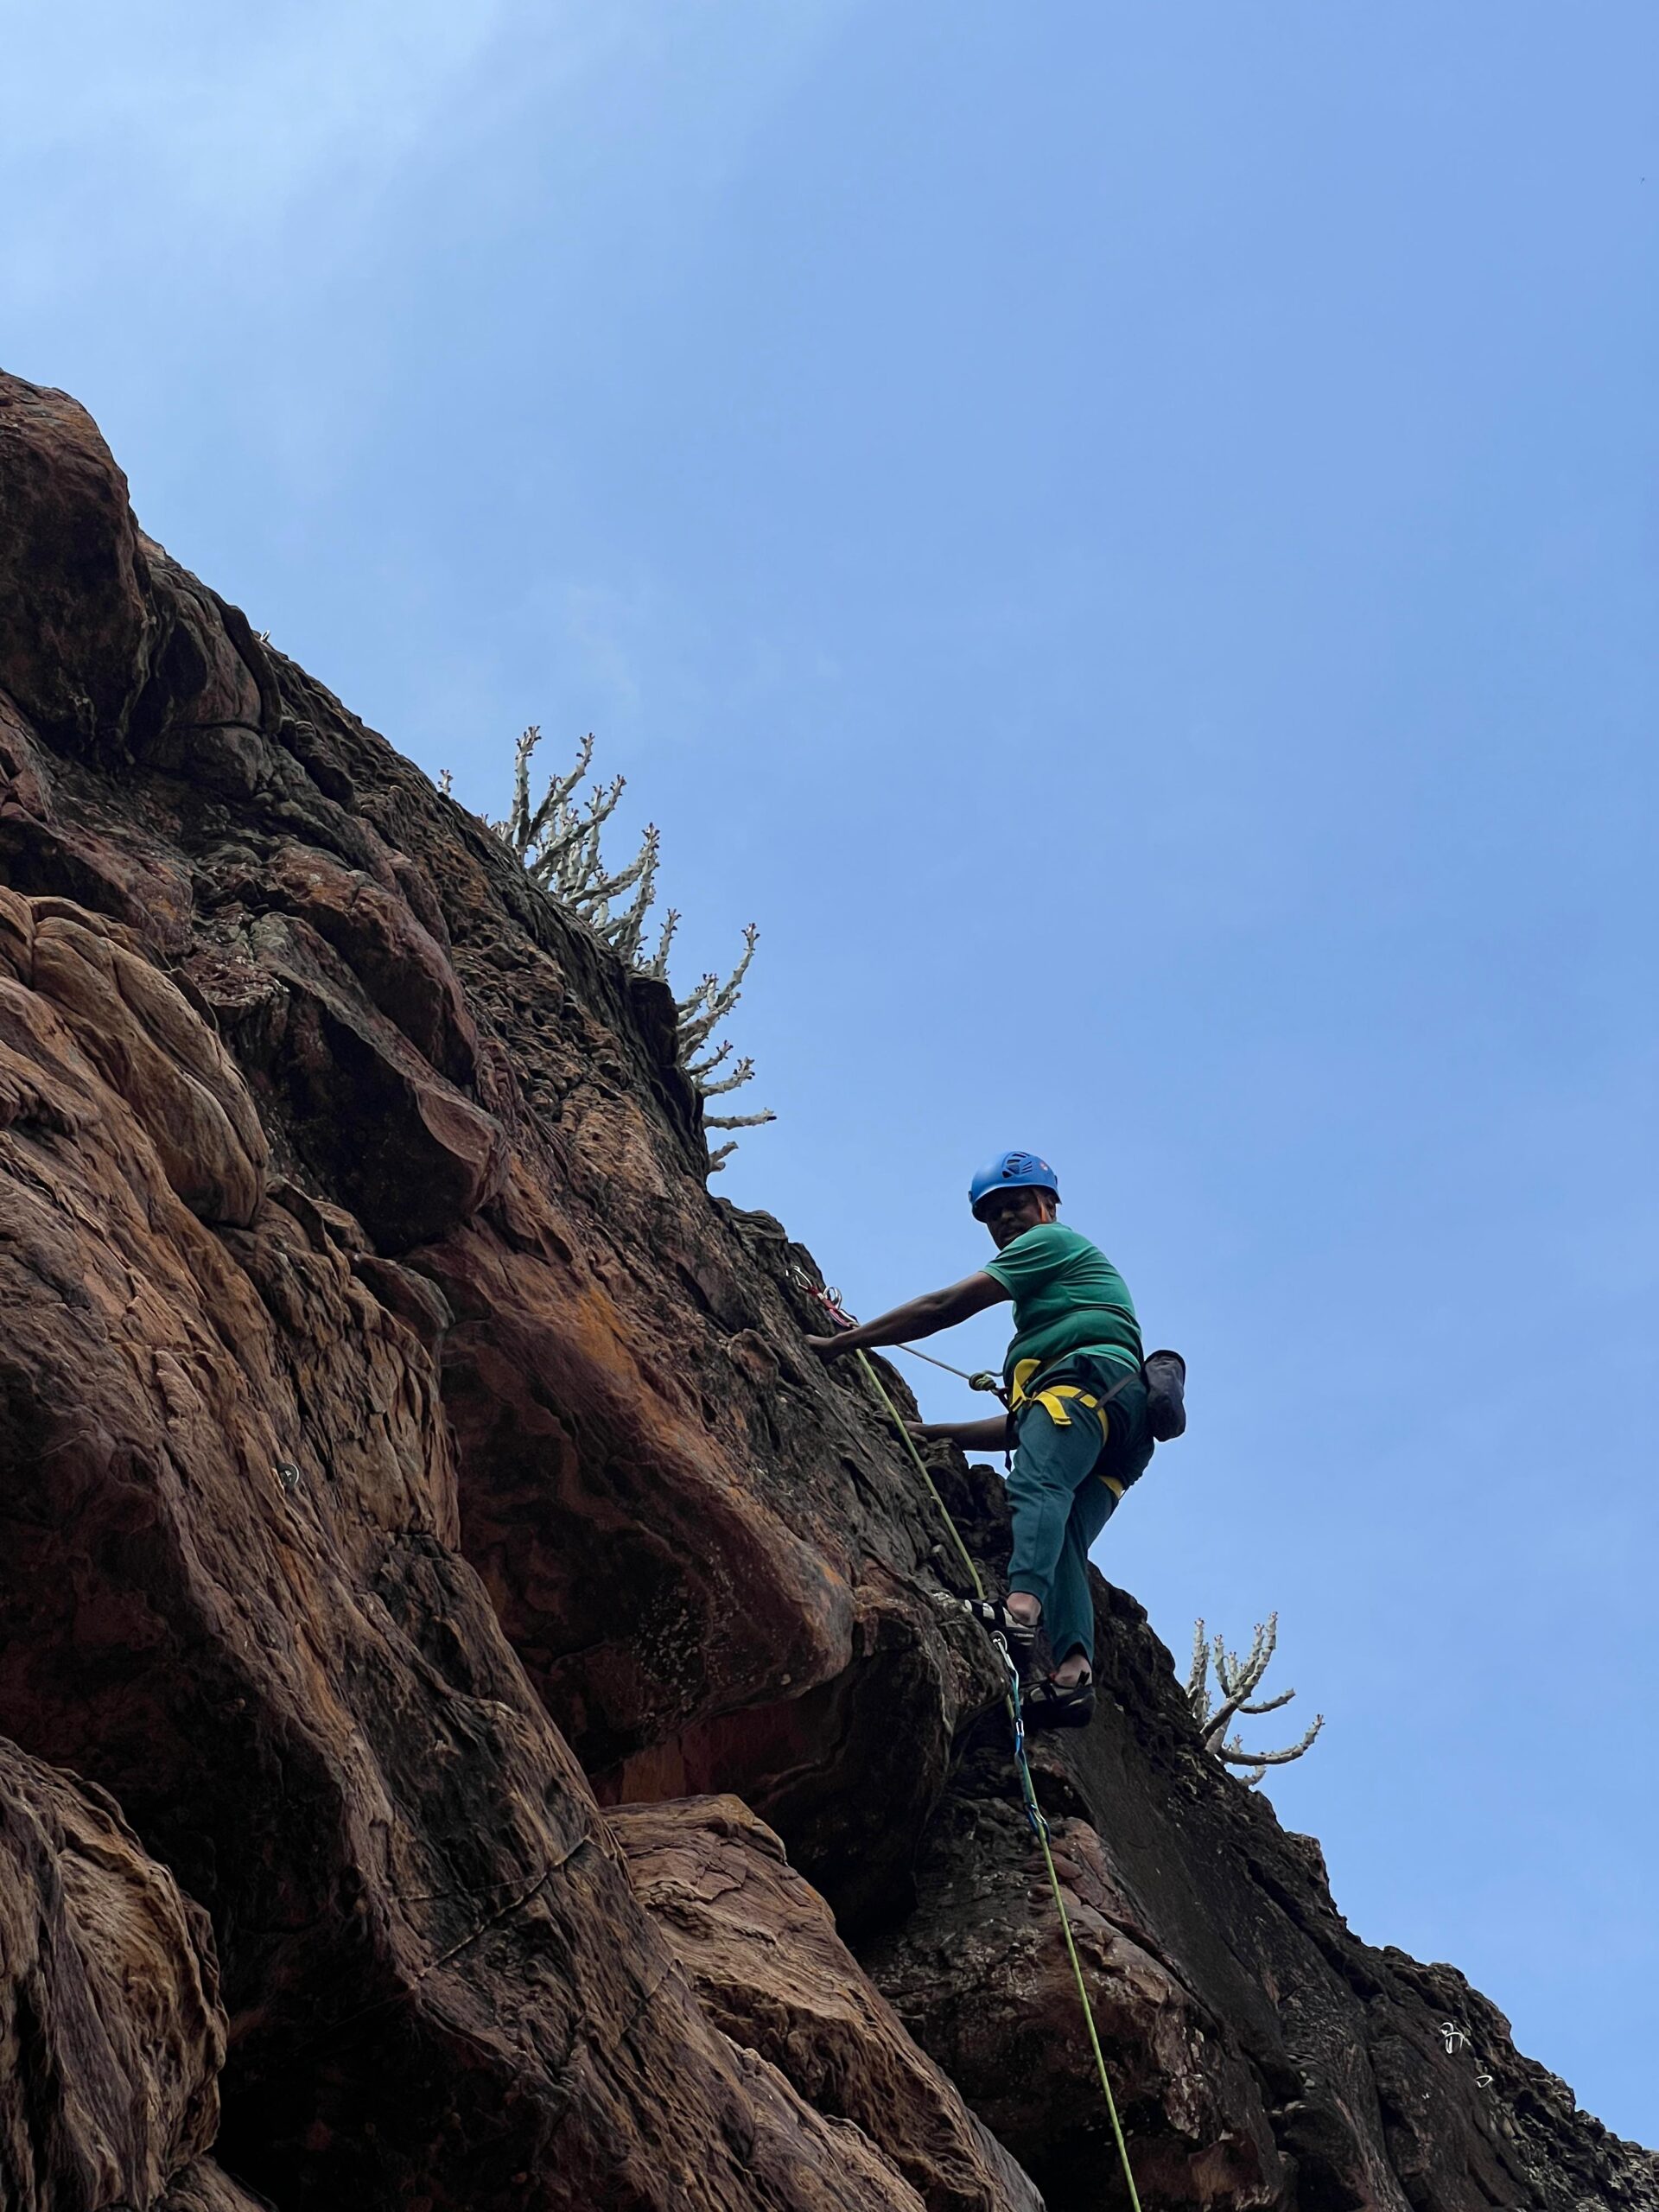
What is Lead Climbing? A Comprehensive Guide
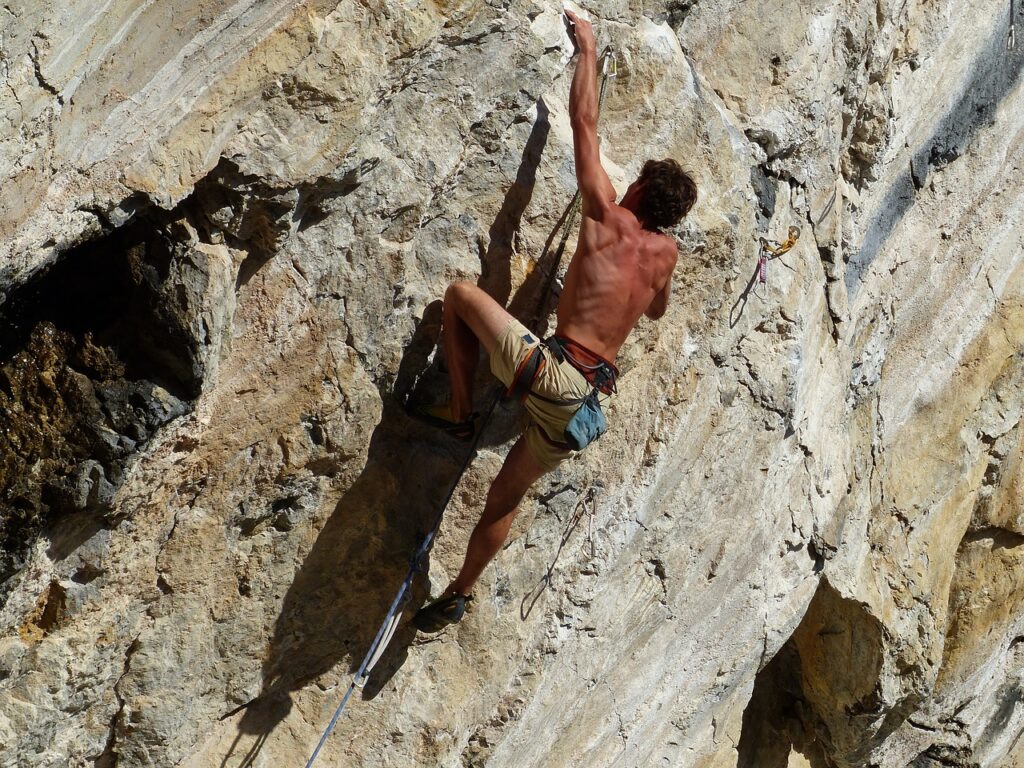
Have you ever watched climbers scaling a cliff and wondered how the rope got to the top? When hiking to the top isn’t an option, someone has to lead climb the route. Lead climbing is a more advanced climbing technique that involves managing your safety as you ascend.
In lead climbing, the rope runs directly from the belayer to the climber. As the climber progresses up the route, they clip the rope into fixed bolts on the wall (sport climbing) or removable trad gear (traditional climbing). This setup differs from top-rope climbing, where the rope is pre-set through a top anchor before the climb begins.
The lead climber, often referred to as being on the “sharp end of the rope,” must move above the last piece of protection to continue climbing. This introduces a unique challenge: if the climber falls before clipping into the next bolt or gear placement, they’ll fall at least twice the distance between themselves and the last protection point, plus any slack in the rope and rope stretch.
Learning to Lead Climb
Step 1: Get Proper Training
Before attempting to lead climb, ensure you receive proper training from a reputable guide service or experienced climber. Lead climbing requires knowledge of:

- Placing and evaluating trad gear (if leading on trad routes).
- Clipping quickdraws securely into bolts.
- Proper lead belaying techniques.
- Rope management and building anchors.
Step 2: Assess Your Mental Readiness
Lead climbing introduces higher risks and requires a calm, focused mindset. Ask yourself if you’re ready for the challenge. Avoid being pressured by peers with phrases like “You got this!” if you’re not confident in your skills.
When climbing above gear, maintaining composure and managing rope are essential. If you’re not mentally ready, continue following lead climbers and practicing skills to build confidence.
Step 3: Try a Mock Lead
For beginners, mock leading is an excellent introduction to lead climbing. With a mock lead, you climb a route on top rope while simultaneously practicing lead climbing techniques with a second rope. This approach lets you focus on placing gear, clipping bolts, and managing rope without the risk of an uncontrolled fall.
To do a mock lead, you’ll need two ropes and two belayers—one for the top rope and one for the lead rope.
Step 4: Start with Easy Routes
When you’re ready to lead for the first time, choose routes well within your comfort zone. Keep these tips in mind:
- Don’t be afraid to start with beginner-friendly routes.
- Just because you can climb 5.10 on top rope doesn’t mean you’re ready to lead at that level.
- Indoor climbing gyms can be a great place to start, but outdoor climbing adds complexities like building and cleaning anchors.
Pick a route where you feel stable and in control so you can focus on gear placement, clipping bolts, and managing the rope.
Risks of Lead Climbing
Lead climbing inherently carries more risk than top-rope climbing. Falls are a common part of lead climbing, and while some are harmless, others can result in rope burn, scrapes, broken bones, or worse.
Managing Risk
While you can’t eliminate all risks, you can manage them with these strategies:
- Seek proper training: Ensure both the climber and belayer are skilled in lead climbing techniques.
- Find a trustworthy belayer: Only climb with someone who is attentive and experienced in lead belaying.
- Assess the route: Evaluate the consequences of a fall at different points. Are there ledges or obstacles in the fall line?
- Inspect the gear: Check bolts and gear placements for security.
- Stay within your limits: Build confidence and experience on easy routes before progressing to harder climbs.
Learning to Fall
Falling is an inevitable part of lead climbing, especially in sport climbing. Taking controlled falls in low-risk situations helps build trust in your gear and belayer. Trad climbers tend to be more conservative, but well-placed trad gear can catch falls effectively.
Falling practice also benefits belayers, allowing them to fine-tune their ability to manage slack and catch falls safely.
Gear for Lead Climbing
Lead climbing builds on the standard climbing gear used for top-rope climbing, with additional equipment tailored to sport or trad climbing.
Essential Gear for Sport Leading:
- Quickdraws: The number needed depends on the number of bolts on the route.
- Anchor-building gear: Often includes quickdraws, slings, and locking carabiners.
Essential Gear for Trad Leading:
- Removable gear: Such as nuts, cams, and hexes for placing protection.
- Quickdraws: Used to extend placements and reduce rope drag.
- Anchor-building gear: Includes items like a cordelette and multiple locking carabiners.
When lead climbing outdoors, the climber must have the gear and knowledge to build and clean anchors at the top of the route. Indoor climbing gyms often provide pre-installed quickdraws and anchors, simplifying the process.
Lead climbing is an exciting and challenging step in any climber’s journey, offering a greater sense of freedom and accomplishment. However, it requires proper training, mental readiness, and a focus on safety. By starting with easy routes, practicing mock leads, and managing risks effectively, you can build the skills and confidence needed to lead climb successfully.
Remember, climbing safety is your responsibility. No guide or article can replace hands-on experience and proper instruction from qualified professionals. Climb smart, stay safe, and enjoy the journey to the sharp end of the rope!
Common Clipping Mistakes: Back Clipping and Z-Clipping
Proper rope clipping is crucial for climbing safety, but mistakes like back clipping and Z-clipping can compromise your protection. Understanding these errors and how to avoid them will ensure a safer and smoother climbing experience.
Back Clipping: Why It’s Dangerous
What is Back Clipping?
Back clipping occurs when the rope is clipped incorrectly into the quickdraw. Instead of the rope exiting the carabiner from the wall toward you, the belayer’s side of the rope ends up on top, while the climber’s side is on the bottom.
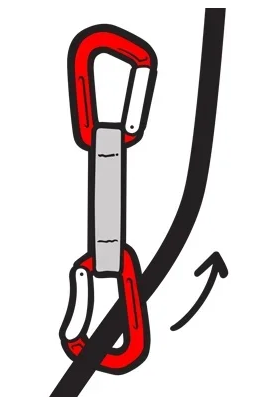
Why It’s a Problem:
When the rope is back clipped, a fall can cause the rope to twist and unclip itself from the carabiner. This leaves you without the protection of that quickdraw, putting you at significant risk.
How to Avoid Back Clipping:
- Always clip the rope so that it comes out of the carabiner from the wall toward you.
- Ensure the climber’s side of the rope sits on top and the belayer’s side on the bottom.
- Practice clipping correctly on the ground to build good habits.
Pro Tip: If you’re belaying and notice the climber has back clipped, immediately alert them to fix it before continuing.
Z-Clipping: A Recipe for Rope Drag
What is Z-Clipping?
Z-clipping happens when the climber pulls the rope from below the last clipped quickdraw and mistakenly clips it into a higher quickdraw. This creates a “Z” shape in the rope.
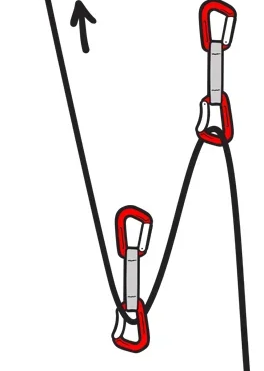
Why It’s a Problem:
- The Z-shape introduces severe rope drag, making it difficult to climb efficiently.
- The higher quickdraw becomes useless as it doesn’t provide proper protection.
How to Avoid Z-Clipping:
- Always pull the rope directly from your tie-in knot when clipping a higher quickdraw.
- Be mindful of the rope’s path to avoid crossing or tangling.
- Take your time on tightly bolted routes, ensuring you’re clipping the correct segment of rope.
Pro Tip: If you find yourself Z-clipped, down-climb to fix the issue or ask your belayer for assistance.
Key Takeaways
- Back Clipping: Always clip the rope so it runs from the wall toward you. The climber’s side should be on top, and the belayer’s side on the bottom.
- Z-Clipping: Pull the rope directly from your harness tie-in knot to avoid crossing lines.
Understanding these mistakes and staying vigilant can prevent accidents and ensure a safer climbing session. Always double-check your clips and correct any errors before proceeding. Safe climbing!
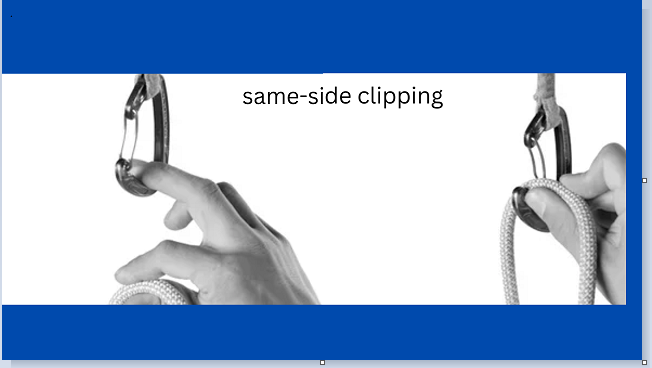
same-side clipping. For use when clipping a left-facing draw with your left hand or a right-facing draw with your right hand. Reach down with your palm up and pinch the rope between your thumb and index finger. Pull the rope up to the draw. Loosen your grip on the rope so it’s either draped loosely over your pointer finger or pinched between your pointer and middle finger (try both: some people prefer one, some prefer the other). Next, wrap your thumb around the spine of the carabiner and position the rope in front of the carabiner’s gate. Then push the rope through the gate with your pointer finger.
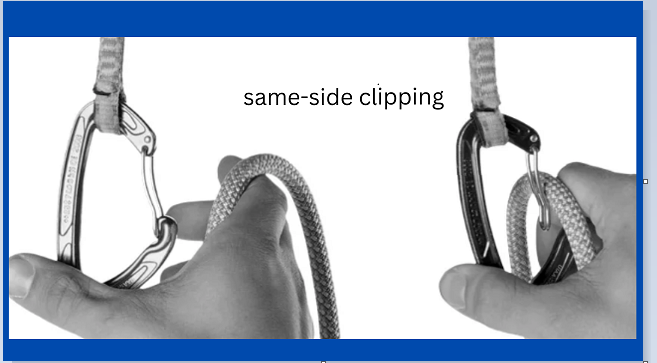
For use when clipping a right-facing draw with your left hand or a left-facing draw with your right hand. Pinch the rope between your thumb and pointer finger, then lay your middle finger inside the carabiner. Using your middle finger to hold the draw in place, push the rope through the gate with your thumb and forefinger
Essential Tips for Learning to Clip Quickdraws and Lead Climb Safely
Clipping quickdraws efficiently and lead climbing with confidence requires practice, preparation, and an understanding of common challenges. Here’s a step-by-step guide to mastering these skills and overcoming the fear of lead climbing.
1. Practice Clipping Off the Wall
Before attempting to clip quickdraws on a climb, practice at ground level. This allows you to focus on technique without the added pressure of climbing.
- Setup: Use a fixed quickdraw and a short length of rope (a “monkey tail”). Hang the quickdraw from an anchor or hangboard, and practice clipping in different configurations.
- Duration: Spend 10-20 minutes per session, repeating the process until it feels second nature.
- Why It Matters: Clipping should become a reflexive action. This reduces fumbling when you’re pumped mid-climb.
2. Do a Mock Lead
Mock leading is a great way to simulate lead climbing without the risk of falling.
- How It Works: Climb a route on top rope while clipping a second rope into quickdraws along the way.
- Benefits:
- Gets you accustomed to the logistics of lead climbing.
- Helps you practice placing quickdraws and clipping without the fear of falling.
- Drawbacks: It can be time-consuming compared to practicing on the ground.
3. Choose the Right Route for Your First Lead
For your first outdoor lead climb, select a route that minimizes challenges:
- Criteria:
- A sport route with closely spaced bolts.
- A climb that’s below your maximum grade.
- Preferably a route you’ve top-roped before.
- Preparation:
- Carry enough quickdraws for all bolts and anchors.
- Consider ledges or potential obstacles and strategize clipping points.
- Use a stick clip for the first bolt if the start looks difficult.
4. Practice Taking and Resting on the Rope
Learning to take rests on the rope can help build trust in your gear and belayer.
- How to Practice:
- Climb to the first or second bolt, clip in, and call “Take!” to rest on the rope.
- Gradually climb higher and take at each bolt to get comfortable with the system.
- Why It’s Important:
- Builds confidence in the rope and belay system.
- Reinforces that you can pause and recover when needed.
5. Practice Falling (Fall Progressions)
Falling is an inevitable part of lead climbing. Controlled practice helps you and your belayer gain confidence in managing falls.
- Steps for Fall Progressions:
- Fall below the quickdraw with some slack in the rope.
- Fall with the quickdraw at your waist.
- Fall from a position where your knees are above the last draw.
- Fall from just below the next quickdraw—close enough to clip but intentionally let go.
- Key Guidelines:
- Practice on overhanging walls with no obstacles.
- Ensure you’re high enough to avoid ground falls.
- Never let the rope run behind your leg to prevent flipping upside down.
6. Overcoming the Fear of Falling
Fear of falling can limit your climbing progress. Controlled falls show that the system is safe, helping you move beyond this mental block.
- Understand the System: Falls are a normal and expected part of lead climbing. Trust your gear and belayer.
- Stay Fearful of Obstacles: While falling is safe, always assess for ledges or the ground. Awareness of these risks helps you climb smarter.
Key Takeaways
- Practice Makes Perfect: Build muscle memory for clipping by practicing on the ground.
- Mock Leads Build Confidence: Use them to simulate lead climbing logistics without the risk.
- Learn to Trust Your Gear: Practice taking and falling to gain confidence in the system.
- Pick Smart Routes: Start with well-bolted, beginner-friendly climbs.
By following these tips and training effectively, you’ll feel prepared and confident for your first lead climb. Safe climbing!
Lead climbing near me
Karnataka offers several excellent locations for lead climbing enthusiasts. Here are some notable spots:
Known for its red sandstone cliffs, Badami features over 150 bolted routes suitable for lead climbing. The area offers a variety of routes ranging from 5b to 8b+, catering to climbers of different skill levels.
Approximately 50 km from Bangalore, Ramanagara is renowned for its giant rocks and is a popular destination for rock climbers. The area offers various climbing opportunities, including lead climbing.
Karnataka Tourism
Bengaluru, Karnataka
Located in South Bangalore, Turahalli is a local bouldering area that also offers opportunities for lead climbing. The area is known for its variety of climbs suitable for day-long or weekend outings.
Mountain Project
Bengaluru, Karnataka
Approximately 50 km from Bangalore, Savandurga is a 1,200-foot tall monolith offering a variety of climbs, including lead climbing. The area is suitable for day-long or weekend outings.
Mountain Project
Kolar, Karnataka
Located near Kolar, Antharagange is known for its granite boulders and offers opportunities for lead climbing. The area is popular among climbers for its unique rock formations.
Hampi, Karnataka
Hampi is famous for its granite boulders and offers opportunities for lead climbing. The area is popular among climbers for its unique rock formations.
For those interested in training or guided experiences, several organizations in Karnataka offer rock climbing courses and workshops. Here are a few options:
Lead climbing vs top rope
Lead climbing and top-rope climbing are two of the most common styles of rock climbing. Here’s a breakdown of their key differences:
Lead Climbing
- Climbing Style: In lead climbing, the climber ascends the rock while securing themselves to a rope. However, the rope is not fixed at the top of the route. Instead, the climber clips the rope into a series of protection points (like bolts or trad gear) as they climb.
- Risk Factor: Lead climbing involves a higher level of risk compared to top-rope because the climber can fall the length of rope below their last clipped protection point, potentially resulting in a significant fall.
- Climbing Experience: Lead climbing requires more technical skills and mental focus since the climber is responsible for both their movement and placing protection.
- Belaying: The belayer must manage the rope and provide tension while the climber ascends. They are ready to catch a fall but need to react quickly as the climber moves.
- Difficulty: Typically considered more challenging because of the potential for falls and the added responsibility of placing protection.
Top-Rope Climbing
- Climbing Style: In top-rope climbing, the rope is anchored at the top of the route, and the climber is belayed from below. The climber ascends the rock while the rope runs through an anchor point at the top, ensuring that they will not fall far if they slip.
- Risk Factor: The fall risk is much lower in top-rope climbing because the climber is typically only a few feet off the ground and is always belayed directly below by the belayer.
- Climbing Experience: Top-rope climbing is generally more beginner-friendly, as it allows the climber to focus more on technique rather than worrying about falls or managing gear.
- Belaying: The belayer stays at the base of the climb, keeping the rope tight and preventing the climber from hitting the ground.
- Difficulty: Often seen as less challenging compared to lead climbing because of the safety of the rope being anchored at the top.
Summary of Differences:
- Lead Climbing: More challenging, higher risk, climber places protection as they ascend.
- Top-Rope Climbing: Safer, beginner-friendly, rope is anchored at the top, no need to place protection.
Both styles are essential in the climbing world, with lead climbing offering a more adventurous and technical experience, while top-rope climbing provides a safer and often easier introduction to the sport.
Lead climbing vs bouldering
Lead climbing and bouldering are two distinct styles of rock climbing, each with its own set of techniques, equipment, and challenges.
Lead Climbing:
- Height: Lead climbing is done on taller walls, typically ranging from 15 feet (5 meters) to over 100 feet (30 meters).
- Belay System: Climbers are belayed by a partner who controls the rope, ensuring the climber is protected from falls.
- Rope: A rope is used, and climbers clip into anchors as they ascend. The rope catches them if they fall, reducing the risk of injury.
- Techniques: Lead climbing requires endurance, the ability to manage energy over long climbs, and careful route reading to avoid running out of holds and strength.
- Focus: The emphasis is on sustained climbing with careful technique, often requiring strategy to place protection at intervals.
- Difficulty: Typically, the difficulty is rated based on the entire route (including length and variety of moves).
Bouldering:
- Height: Bouldering is done on shorter walls, usually no taller than 15 feet (4-5 meters).
- No Rope: Climbers do not use ropes. Instead, they rely on crash pads placed beneath them for safety during falls.
- Focus on Strength: Bouldering is about powerful, dynamic movements and short, intense routes (called “problems”). It often focuses on strength, explosive movements, and technique.
- Techniques: Climbers use techniques like heel hooks, mantles, and crimping to execute precise movements over short distances.
- Difficulty: The difficulty is measured in individual moves or small sections, often rated by the V-scale (in the U.S.) or the Font scale (in Europe).
Key Differences:
- Equipment: Lead climbing requires a rope, harness, belay device, and other safety equipment; bouldering only needs climbing shoes and crash pads.
- Intensity: Lead climbing is endurance-focused and can take longer due to the route’s length, while bouldering is fast-paced and intense, focusing on power and technique in short bursts.
- Risk: Lead climbing presents more potential fall distance and thus involves a higher level of risk, though the belay system mitigates this. Bouldering falls are shorter but riskier due to the lack of a rope and the reliance on pads.
Both sports require skill, strength, and mental focus, but they cater to different aspects of climbing.
Lead Climbing competition
Lead climbing competitions are a type of indoor climbing event where climbers attempt to ascend a tall, roped climbing wall in a set amount of time. The goal is to climb as high as possible, with the climber’s performance being judged based on their success in reaching the highest point on the wall.
Here’s an overview of how a typical lead climbing competition works:
- The Wall: The climbing wall is usually 15–20 meters (50–65 feet) tall, with a variety of holds and routes set by course setters. The route will often have difficult sections, and climbers need to figure out the most efficient way to climb it.
- Climbing Format:
- Climbers are given a specific amount of time (usually 6 minutes) to climb the route.
- Each route will be designed to test the climbers’ technical skills, strength, and endurance. The routes typically have “crux” sections—particularly difficult parts—that make the climb challenging.
- Scoring:
- The climber’s score is based on how high they reach on the route. If a climber falls, they are given the highest hold they reached before falling.
- If a climber finishes the route (reaches the top), they earn a perfect score.
- Competition Format:
- In most competitions, climbers are divided into different categories based on skill level, age, or gender.
- Qualification rounds usually involve climbers attempting multiple routes. The climbers with the highest scores advance to the final round.
- Safety:
- The climber is belayed (secured) by a rope attached to a harness. The rope is anchored at the top of the wall, and a belayer is responsible for catching the climber if they fall.
Lead climbing is often part of larger competitions like the IFSC World Cup or the Olympic Games. The discipline emphasizes both physical endurance and mental strategy since climbers need to pace themselves and manage their energy throughout the climb.
Lead climbing vs sport climbing
Lead Climbing vs. Sport Climbing: What’s the Difference?
Lead climbing and sport climbing are closely related disciplines in rock climbing, but they differ in purpose, technique, and application. Let’s dive into a detailed comparison to understand these two styles better.
1. Definition
Lead Climbing
- A climbing style where the climber ascends a route while clipping the rope into pre-placed protection points (quickdraws) as they go.
- It’s both a sport and a traditional outdoor climbing practice.
Sport Climbing
- A broader category of climbing that includes routes with fixed protection (bolts) and emphasizes physical and technical climbing rather than placing your own protection.
- Sport climbing encompasses lead climbing as one of its sub-disciplines.
2. Key Differences
| Aspect | Lead Climbing | Sport Climbing |
|---|---|---|
| Scope | A specific technique within sport climbing. | A broader discipline that includes lead climbing, top-rope climbing, and bouldering. |
| Style | Requires clipping into bolts as you climb. | Focuses on pre-bolted routes with varied styles (lead or top-rope). |
| Objective | To climb as high as possible or complete a route without falling. | To challenge physical and mental climbing skills on bolted routes. |
| Equipment | Rope, harness, quickdraws, belay device, and protection gear. | Similar equipment but can also include bouldering pads for shorter climbs. |
| Environment | Typically outdoors or competition climbing walls. | Includes outdoor crags and indoor climbing gyms. |
| Difficulty | Includes the added challenge of clipping the rope while climbing. | Varies widely and can be tailored to skill levels. |
| Risk | Falling before clipping can result in significant falls. | Generally safer due to fixed protection and less risk of long falls. |
3. Shared Characteristics
- Pre-Bolted Protection: Both styles often rely on pre-drilled bolts for safety.
- Physical Demands: Both require strength, technique, and mental focus.
- Indoor and Outdoor Options: Practiced in gyms and natural climbing areas.
4. Competition and Recreational Context
Lead Climbing
- Featured in sport climbing competitions like the Olympics.
- Climbers aim to ascend a tall wall within a set time and are judged based on height achieved.
- A common choice for advanced and technical climbing routes.
Sport Climbing
- Includes lead climbing as well as bouldering and top-roping.
- Prioritizes athleticism and problem-solving over traditional climbing skills like placing protection.
- More beginner-friendly options available.
5. Safety Considerations
- Lead Climbing: Requires experience and practice due to the potential for longer falls.
- Sport Climbing: Safer for beginners because of top-rope options and the controlled environment of climbing gyms.
6. Popularity and Appeal
- Lead Climbing: Appeals to experienced climbers seeking a challenge and adrenaline.
- Sport Climbing: More accessible, making it a popular entry point for new climbers.
Conclusion
Lead climbing is a specific subset of sport climbing that involves more technical skills and risk management. Sport climbing, on the other hand, serves as an umbrella term that includes various styles, including lead climbing, top-roping, and bouldering. Whether you’re aiming to clip into bolts high above the ground or enjoy a variety of climbing experiences, both styles offer unique challenges and rewards for climbers of all levels.
Lead climbing Olympics
Lead Climbing in the Olympics: A Complete Overview
Lead climbing has gained significant recognition in the climbing community and has become a thrilling component of sport climbing competitions, including the Olympic Games. Here’s everything you need to know about lead climbing in the Olympics:
What is Lead Climbing?
Lead climbing is a discipline where climbers ascend a wall using a rope they clip into pre-placed protection points (quickdraws). The objective is to climb as high as possible on a challenging route within a set time limit, typically 6 minutes in competitive settings.
Lead Climbing in the Olympics
Introduction to Olympic Sport Climbing
Lead climbing was featured as part of sport climbing’s debut in the Tokyo 2020 Olympics, alongside bouldering and speed climbing. The format combined these three disciplines into a single event, where climbers competed across all three for a combined score.
Competition Format
- Climbing Route
- The wall height is approximately 15 meters, with a variety of holds that test strength, technique, and problem-solving skills.
- The route increases in difficulty as climbers ascend.
- Scoring
- Climbers are scored based on the highest hold they reach before falling or the time expires.
- Partial credit is given for controlling or attempting a hold before falling.
- Time Limit
- Each climber has a 6-minute limit to complete the route.
Lead Climbing in the Combined Format
In Tokyo 2020, lead climbing was part of a combined format:
- Climbers earned points in speed climbing, bouldering, and lead climbing.
- Scores from all three disciplines were multiplied together to determine the final ranking.
Athlete Qualities for Olympic Lead Climbing
- Endurance: Climbers need exceptional stamina to sustain high-intensity movements.
- Precision: Every movement must be deliberate to conserve energy.
- Problem-Solving: Routes require quick thinking and strategy to navigate complex sequences.
- Mental Toughness: Climbers must stay calm under pressure.
Highlights from Tokyo 2020
- Medal Winners (Men):
- Gold: Alberto Ginés López (Spain)
- Silver: Nathaniel Coleman (USA)
- Bronze: Jakob Schubert (Austria)
- Medal Winners (Women):
- Gold: Janja Garnbret (Slovenia)
- Silver: Miho Nonaka (Japan)
- Bronze: Akiyo Noguchi (Japan)
Janja Garnbret’s flawless lead climbing performance highlighted her exceptional skills and cemented her as one of the sport’s greats.
Lead Climbing in Paris 2024
For Paris 2024, the Olympic format has evolved:
- Speed climbing is now a standalone event.
- Bouldering and Lead climbing are combined into a single medal event.
This change allows climbers to focus more on their strengths and makes the competition more dynamic and exciting.
Why is Lead Climbing Popular in the Olympics?
- It showcases the perfect blend of strength, endurance, and mental acuity.
- The suspense builds as climbers push higher, captivating audiences worldwide.
- It’s a visually engaging sport, highlighting the climbers’ athleticism and strategy.
Future of Lead Climbing in the Olympics
With its growing popularity, lead climbing is expected to remain a staple in the Olympic Games, inspiring more athletes and fans to embrace this challenging and exhilarating sport.
Lead climbing equipment list
Essential Equipment List for Lead Climbing
Lead climbing is a technical and adventurous form of climbing where safety and preparation are crucial. Below is a comprehensive list of gear you’ll need for a safe and efficient lead climbing experience:
1. Harness
- A comfortable and secure climbing harness with gear loops to hold quickdraws and other equipment.
- Recommended Features: Adjustable leg loops, padding for extended climbs.
2. Climbing Rope
- Dynamic Rope: Designed to stretch to absorb the impact of a fall.
- Length: Usually 60–70 meters, depending on the route.
- Diameter: 9.5mm to 10.5mm is ideal for durability and manageability.
3. Quickdraws
- Used to clip the rope into protection points on the rock.
- Quantity: Typically 10–12 quickdraws for sport routes, but more may be needed for longer climbs.
- Features: Lightweight, durable carabiners with a smooth clipping mechanism.
4. Belay Device
- Used to control the rope during belaying.
- Options: Assisted-braking devices like GriGri or tubular devices like ATC.
- Ensure compatibility with your rope diameter.
5. Climbing Helmet
- Protects against falling debris and head impacts during falls.
- Features: Lightweight, well-ventilated, and certified for climbing.
6. Climbing Shoes
- Specialized shoes with a snug fit and sticky rubber for traction.
- Choose between aggressive or neutral styles depending on the climb’s difficulty and your comfort level.
7. Chalk and Chalk Bag
- Keeps hands dry for better grip.
- Extras: Chalk bags with secure closures and waist belts for easy access.
8. Anchor Building Equipment
- For Sport Climbing: Extra quickdraws or locking carabiners for anchoring at the top.
- For Trad Climbing: Nuts, cams, and slings for building anchors.
9. Locking Carabiners
- Used for securing the belay device, anchors, and other critical connections.
- Quantity: At least 2–3 locking carabiners.
10. Climbing Protection (For Trad Climbing)
- Nuts, cams, hexes, and other devices for placing protection in cracks or gaps.
- Optional for Sport Climbs: Slings and cord for extending placements or emergencies.
11. Climbing Rope Bag
- Keeps the rope clean, organized, and easy to carry.
- Many bags double as a tarp to protect the rope from dirt.
12. Personal Safety Gear
- Prusik Cord: For self-rescue or rappelling backups.
- Slings: For extending protection or self-anchoring.
- Belay Gloves: Protect hands during long belays or rappels.
13. Backpack
- Large enough to carry all your gear.
- Features like hydration compartments and comfort padding are helpful for long approaches.
Additional Tips
- Inspect Gear Regularly: Check for wear and tear before every climb.
- Know the Route: Research the climb to ensure you bring the right amount of gear.
- Practice Anchor Building: Familiarize yourself with creating secure anchors before attempting lead climbs.
With the right equipment and preparation, lead climbing can be an exhilarating and rewarding experience. Always prioritize safety and enjoy the adventure!