Mastering Jumaring: A Guide to Vertical Ascents
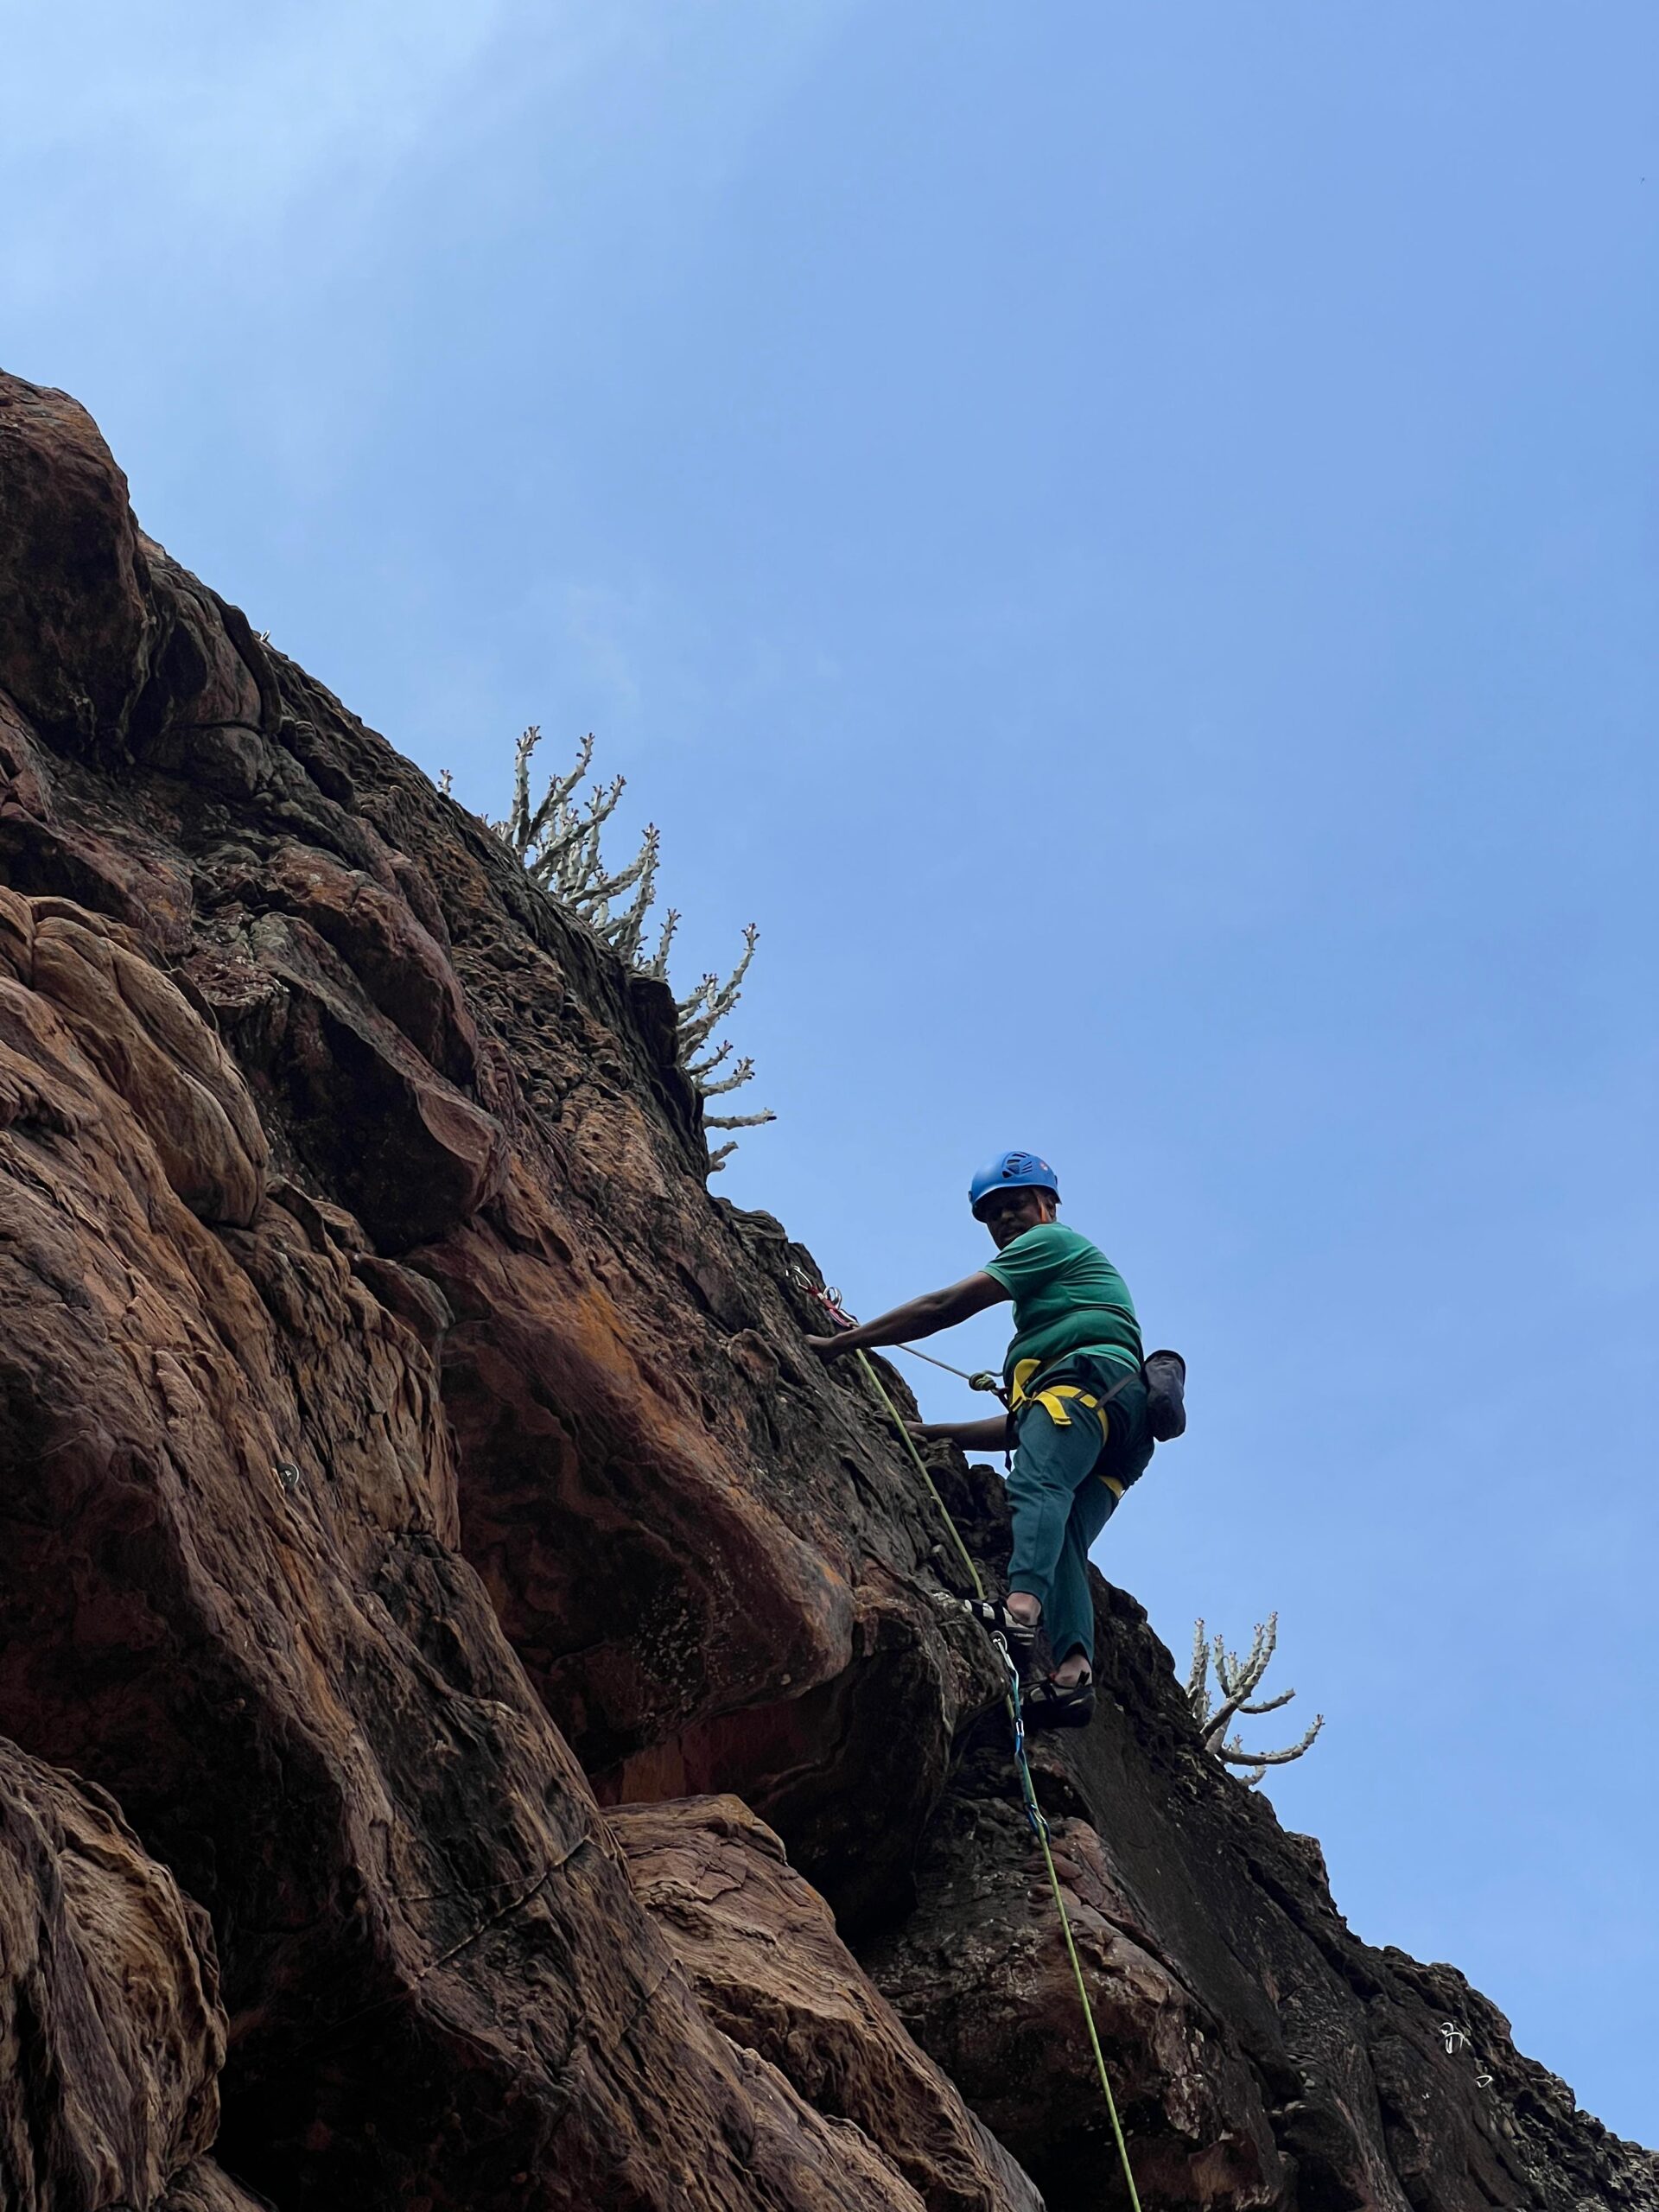
If you’re an adventure enthusiast looking to explore the vertical world, jumaring is a skill you’ll want to master. Whether you’re scaling towering rock faces, ascending fixed ropes in a cave, or navigating glacial crevasses, jumaring provides the tools to conquer vertical challenges safely and efficiently. In this guide, we’ll dive into the essentials of jumaring, its equipment, techniques, and tips to enhance your climbing experience.
What is Jumaring?
Mastering the Ascent: A Guide to Jumaring
Whether you are tackling a massive big wall or navigating a vertical pitch with minimal holds, Jumaring (also known as rope ascending) is a fundamental skill every climber should have in their toolkit. While traditional climbing is about moving on rock, jumaring is about moving on the rope itself.
What is Jumaring?
Jumaring is a technique that uses mechanical ascenders (Jumars) to climb a fixed line. It is the gold standard for aid climbing and essential for hauling gear or ascending pitches quickly when the terrain becomes too difficult to free climb.
The Gear & Setup
To get moving, you typically use a two-ascender system:
- The Upper Jumar: Attached to your hand and a daisy chain.
- The Lower Jumar: Attached to your foot via an aider (foot loop).
Finding Your Flow: The Rhythm of the Rope
The secret to efficient jumaring isn’t arm strength—it’s weight distribution. To minimize fatigue, you want to “walk” up the rope by keeping your weight over your feet and staying close to the line.
The Basic Sequence:
- The Stand: Weight your lower foot loop and stand up straight.
- The Slide: Push your upper jumar as high as it will go.
- The Sit: Sit back into your harness, weighting the upper daisy chain.
- The Reset: Slide your lower jumar (and foot loop) up the rope.
- Repeat: As you move, remember to pull the “stretch” out of the rope to maintain a tight, efficient rhythm.
Pro Tip: Keep your chest close to the rope. The further you lean back, the more energy you waste. Think of it as a vertical hike, not a pull-up!
The Essential Gear for Jumaring
Before heading out to practice jumaring, ensure you have the following equipment:
- Ascenders: The primary tools for rope ascension, ascenders like the Jumar or Petzl Ascension grip the rope and allow upward movement while preventing downward slippage.
- Harness: A comfortable and secure climbing harness to attach your ascenders and other gear.
- Climbing Rope: A static rope is ideal for jumaring as it offers minimal stretch and greater stability.
- Safety Tether: Keeps you secured to the rope at all times, ensuring safety during ascents.
- Foot Loops or Ascender Slings: Adjustable loops to support your feet and make climbing more efficient.
- Helmet: Protects against falling debris or accidental impacts during ascents.

Jumaring Techniques: Step-by-Step Guide
- Secure the Rope: Ensure the rope is properly anchored and tensioned. Test its stability before starting your ascent.
- Attach Ascenders: Place your upper ascender on the rope above your head and secure it. Attach a second ascender with a foot loop for support.
- Position Yourself: Stand in the foot loop and push the upper ascender upwards, locking it onto the rope. This sets the stage for a smooth upward motion.
- Climbing Motion:
- Step into the foot loop and straighten your leg to push yourself upwards.
- Slide the upper ascender higher on the rope.
- Sit back in your harness to rest and repeat the process.
- Maintain Safety: Always stay attached to the rope using a safety tether or backup ascender.
Pro Tips for Efficient Jumaring
- Practice Body Positioning: Keep your body close to the rope and maintain a steady rhythm for efficiency.
- Use Your Legs: Avoid overusing your arms by relying on your legs to propel you upward.
- Inspect Gear Regularly: Check your ascenders, harness, and ropes for wear and tear before each climb.
- Learn Rope Management: Keep the rope untangled and clear of obstacles to ensure a smooth ascent.
- Build Strength and Endurance: Core and leg strength are essential for prolonged jumaring sessions. Incorporate climbing-specific exercises into your training.
Where to Learn Jumaring
Many climbing gyms and outdoor adventure schools offer courses on rope ascending and jumaring. These controlled environments provide a safe space to learn and practice under expert supervision. Additionally, joining local climbing or caving clubs can connect you with experienced practitioners who can share valuable insights.
Why Jumaring is Worth It
Jumaring is more than just a climbing technique; it’s a gateway to exploring breathtaking vertical landscapes. From scaling big walls in Yosemite to navigating deep caves or ascending icy peaks, the ability to jumar opens up a world of adventure and achievement. By mastering this skill, you’ll not only enhance your climbing repertoire but also gain confidence in tackling challenging terrains.
Who invented jumar?
The Jumar mechanical ascender was invented in Switzerland in the late 1950s (introduced commercially around 1958). It was created by two men
Adolph Jüsi: A Swiss researcher who studied eagles. He needed a way to climb ropes to reach nests on cliffs
Walter Marti: A precision mechanic who designed and built the tool for Jüsi
The name “Jumar” is a portmanteau of their last names (JUsi and MARti). Because their device became the global standard for big-wall climbing, the verb “to jumar” (jumaring) became synonymous with ascending a rope, even if using different brands like Petzl or Black Diamond
While the mechanical device is Swiss, the technique of using a friction hitch to move up a rope is older.
Karl Prusik: An Austrian mountaineer and music teacher, he is often credited with inventing the Prusik Knot (published in 1931).
Before mechanical jumars existed, climbers “prusiked” up ropes using two loops of cord. The “sit-stand” rhythm we use today with mechanical jumars is a direct evolution of the sequence Prusik popularized.
Key Takeaway for Your Article
If you want to be historically accurate for you can frame it like this:
“While we call the technique jumaring today—named after the 1958 Swiss mechanical invention by Adolph Jüsi and Walter Marti—the concept was born decades earlier. It was Austrian climber Karl Prusik who first formalized the system of rope ascending in 1931 using friction knots. Modern jumaring is essentially ‘Prusiking’ with high-tech Swiss machinery.
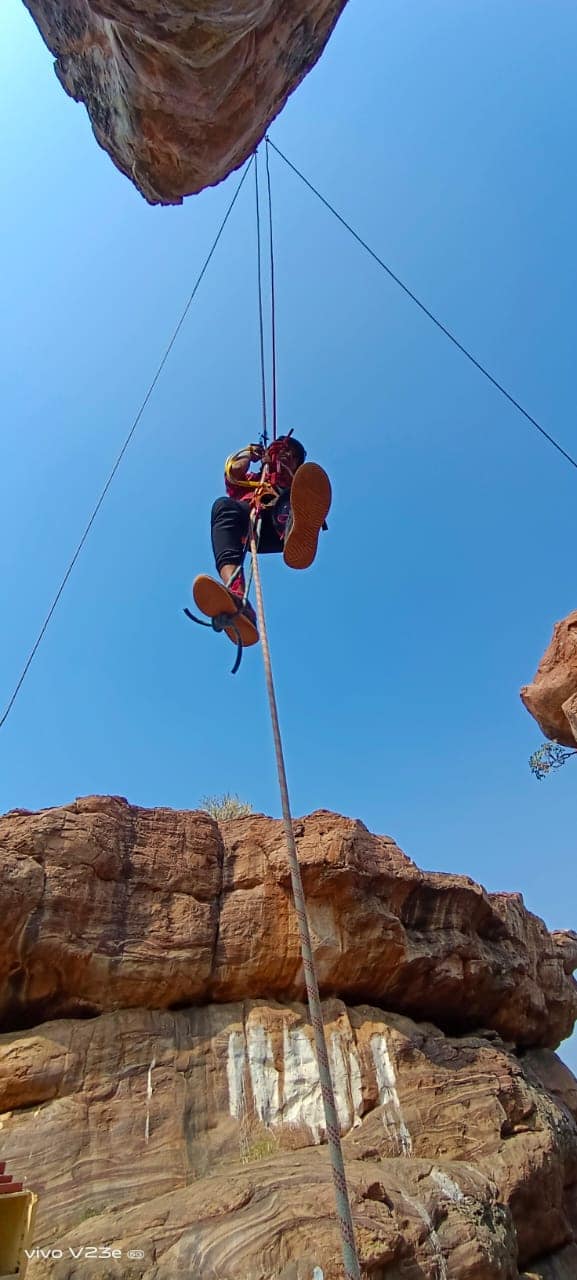
How to jumar a rope?
Once the rope is tight, put your foot in the aider, slide the jumar up, and, while stepping up in the aider, pull the rope through the Grigri. Sit back and weight your harness (held by the Grigri), then slide the jumar back up and repeat
Following an Aid Pitch – Leaving the Belay
Step 1
When the leader confirms that the lead rope is fixed, you can attach yourself to it.
Attach your jumars to the carabiner with your aiders as shown.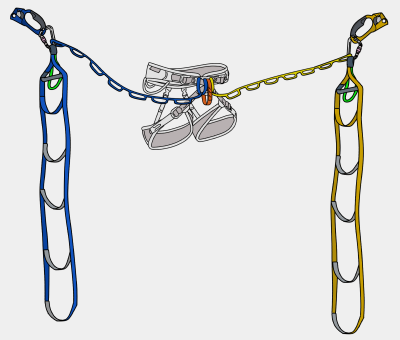
Step 2
Pull the catch back on each of your jumars, slot them onto the rope and close the catch.
Step 3
Adjust your upper daisy to about half of its full length.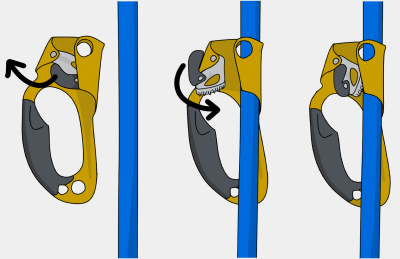
Step 4
Place your feet on appropriate steps of your aiders, so that when your jumars are close together your feet are level with each other. Generally this will be one foot in your third step, the other in your fourth. Step into your lower aider to pull some of the stretch out of the rope. As you do this, push your upper jumar up the rope.
Then sit back, weighting your upper daisy, while pushing your lower jumar up the rope. Your hands do not need to leave their position on the jumars (using two hands to push one jumar is inefficient). Do this a few times until you’ve pulled all the stretch out of the rope, so you are no longer weighting the belay. This sequence is the basic technique, known as jumaring, that you will use to ascend the rope.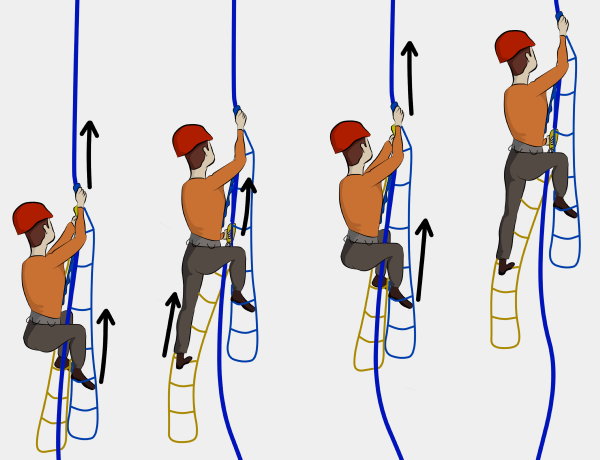
Step 5
Jumars are not full-strength attachment points, so you also need to use a GriGri (or similar) to attach yourself to the rope. Take the slack rope from underneath your jumars and put it through your GriGri as shown. Attach this to your belay loop.
Step 6
While you are attaching yourself to the lead rope, the leader will be setting up the hauling system. When they tell you that the ‘haul rope is ready’, you can reply with ‘releasing haulbag’. Release the haul bag from the belay as described
Step 7
Detach yourself from the belay (but stay tied into the end of the lead rope) and begin cleaning the pitch.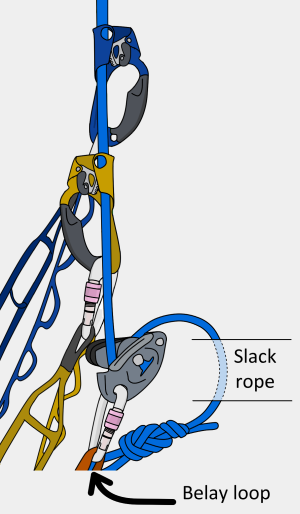
Top Tip
Your top jumar will slide up the rope easily because the rope is tensioned below it (by your lower jumar), but your lower jumar won’t act the same.
To move your lower jumar, you’ll need to pull the catch back slightly with your thumb. This moves the teeth away from the rope without disengaging the catch completely, meaning that it will glide up the rope. When you let go, the catch springs back and locks on the rope. This is a subtle movement which takes a bit of practise to develop.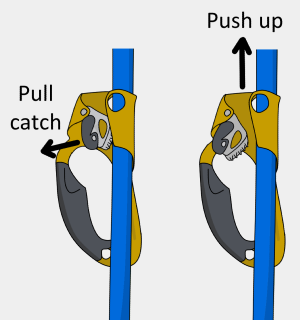
Jumaring on Slightly Overhanging Terrain
Jumaring on steep ground is hard work, but gets easier with practise. The technique is basically the same as for vertical terrain, but you must synchronise your movements to be efficient. Weight your lower aider while simultaneously pushing your upper jumar up the rope (you’ll need to unweight your foot on the upper one to do this). Then sit back on your upper daisy while pushing the lower jumar up, pulling the catch back slightly to help it slide up the rope. You may need to adjust your upper daisy to a shorter length if you are hanging too low.
You should alternate between resting your weight in your harness (when sitting back on your daisy) and having your weight on your legs (when standing up). You don’t need to pull yourself up with your arms. Make sure the rope feeds through your GriGri as you are jumaring up. Sometimes the weight of the rope will do this for you, but often you’ll need to stop every few meters to pull it through. It’s a good idea to clip the rope to your belay loop every 10 meters or so. This helps to keep the rope from getting stuck around distant flakes when it’s windy, and also acts as an extra back-up.
Jumaring on Slabs
Jumaring on lower-angle terrain is easier. All your weight is on your legs – you don’t need to weight your daisies. But if you need a rest, just sit back and hang on your top daisy. You’ll need to adjust your daisies longer and put your feet one step lower in each aider than you would on steep ground.
Removing Gear when Jumaring
Cleaning Straight-Up Sections
On a perfectly straight-up pitch, you can simply unclip and remove gear.
Don’t slam your jumar right up into a knot or piece of gear as it needs to move up a few millimetres before it can be released.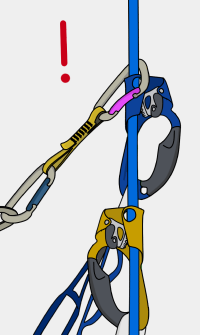
Cleaning Almost Straight-Up Sections
In many cases the gear will be pulled tight by the rope, making it hard to unclip. In this situation:
– Weight your lower jumar
– Remove your upper jumar from the rope
– Re-attach this jumar to the rope above the gear and weight it
– Now you can more easily remove or unclip the gear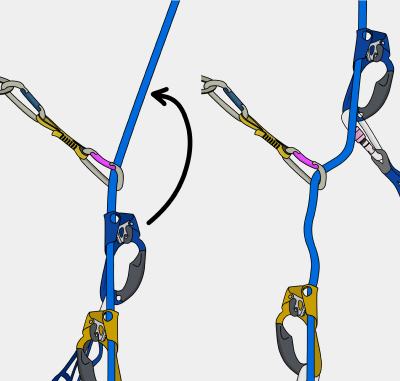
Diagonal Sections
If you use the previous method to remove gear on a diagonal pitch, your lower jumar will get ‘sucked in’ to the gear. To avoid this:
Step 1
Jumar close to the piece.
Step 2
Pull slack through your GriGri and weight it.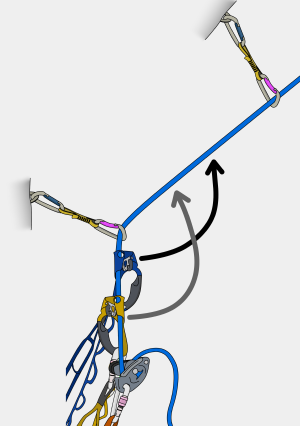
Step 3
Remove both jumars (one at a time) and reattach them above the piece.
Step 4
Release rope through your GriGri so that you are weighting the jumars again.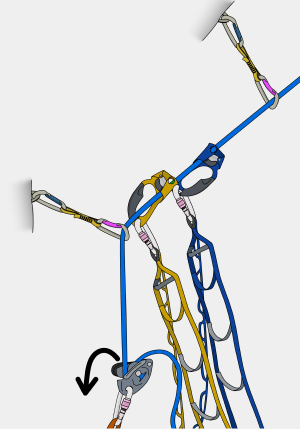
Step 5
Now you can remove the gear.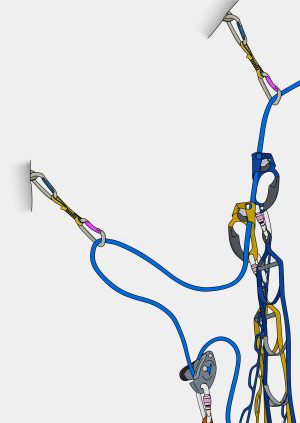
Traverses and Overhangs
To clean a traverse or a steep overhang, you’ll need to take both of your jumars off the rope and clip your aiders into the gear that the leader placed. Effectively, you are ‘leading on top rope’, belaying yourself with your GriGri.
Simply clip across the pieces, removing the ones behind you as you go. Make sure to keep pulling the slack rope through your GriGri and tie back up knots as you go. If the piece held the leader, then it’ll (probably) hold you too. If it doesn’t hold, then you’ll fall safely onto your GriGri and/or back up knots. If the leader did some hook moves on the traverse, you’ll need to bring some hooks with you to repeat those moves when cleaning.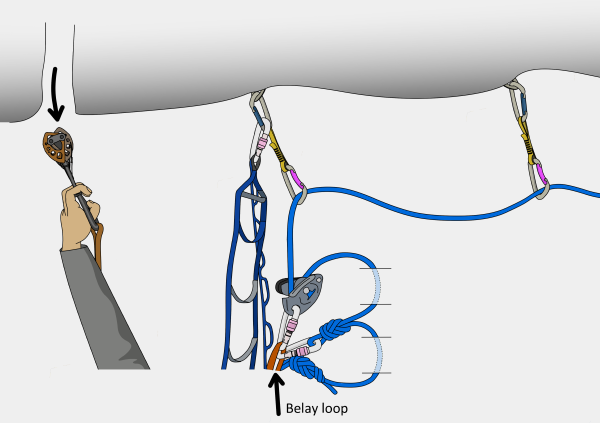
Cleaning Pendulums and Lowering Out
When you reach the piece which the leader pendulumed or tension traversed from, you can’t remove it or else you’ll swing uncontrollably across the wall. To avoid this, you’ll need to do a lower-out.
You’ll need plenty of slack rope for a lower-out (around three times the diagonal distance of the lower-out). This usually isn’t a problem halfway up a pitch, but if there’s a lower-out near the start of a pitch (or straight off the belay), make sure the leader fixes the rope with enough slack for you to do this.
The following method describes lowering out by passing a bight of rope through a fixed piece, therefore not needing to untie from the end of the rope. For very long lower outs, you may need to untie (described later in this article).
Step 1
Remove your jumars from the rope and clip one of your daisies directly into the lower-out piece. On well-travelled routes this will usually be a bolt or a collection of fixed gear. Your weight will be on this daisy while you’re setting up the lower-out.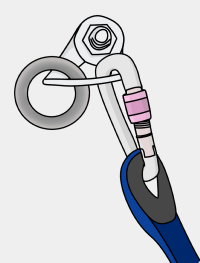
Step 2
Pull all the slack rope through your GriGri so the rope is tight to the upper belay.
Step 3
Take the slack rope from below your GriGri and push a bight of it through the ring or carabiner at the lower-out point.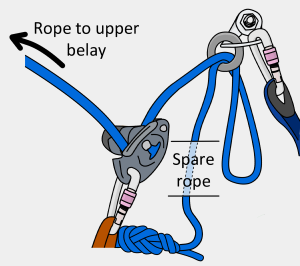
Step 4
Attach the rope to another belay device (such as an ATC) on your belay loop as shown (if you don’t have one, use a munter hitch).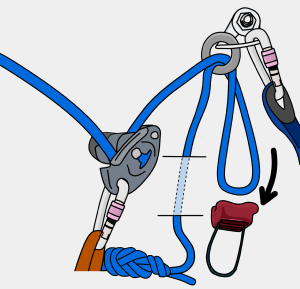
Step 5
Lean into the lower out point and take in all the slack rope through the ATC so that your weight is taken by it.
Step 6
Keeping hold of the brake rope, remove your daisy and any other gear from the lower-out point. Then lower yourself out by letting slack through your ATC.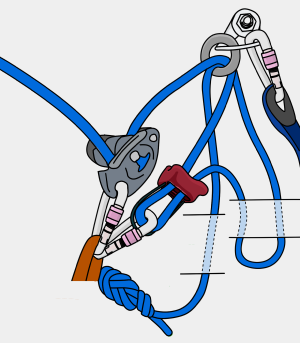
Step 7
When you have finished lowering, put your jumars back on the rope above you, remove your ATC and pull the bight of rope back through the lower out point. You can continue jumaring the now vertical rope.
Top Tip
If you don’t quite have enough rope, you can jumar up a little after lowering as far as you can. This will give you extra rope to complete the lower-out.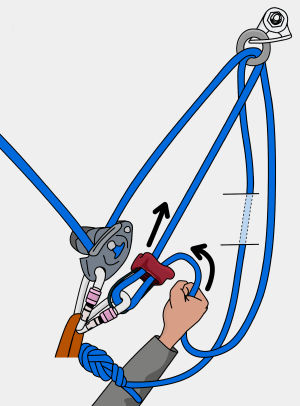
Longer Lower-Outs
The following technique uses half the amount of rope but involves untying from the end. This is useful for very long lower-outs or for lower-outs near the start of a pitch.
Step 1
Follow steps 1 and 2 as described in the previous section and add a back-up knot as shown.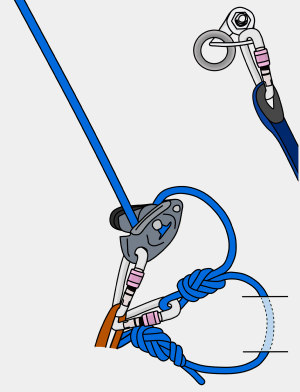
Step 2
Untie from the end of the rope and feed it through the lower-out point.
Step 3
Attach the rope to an ATC (or munter hitch) on your belay loop and pull the slack through so your weight is taken by it.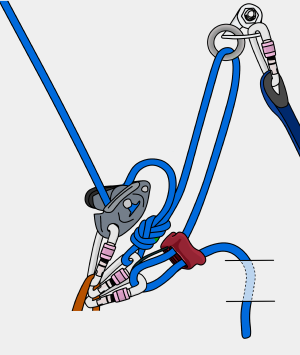
Step 4
Remove your daisy and lower yourself out.
Step 5
When you’ve finished lowering out, remove your ATC, pull the rope through the lower-out point and tie back into the end.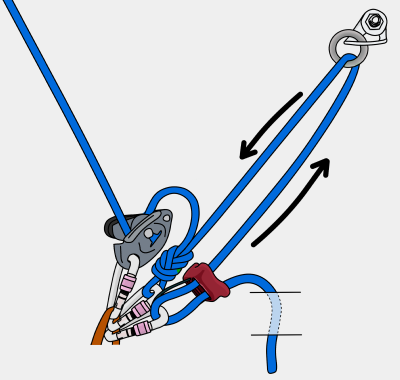
Rappelling is descending down a rope. Usually relying on some sort of device fitted to the rope to control your rate of descent. Jumaring is climbing up a rope using a mechanical device – a Jumar – that slides in one direction and locks in the other
The Jumar mechanical ascender was invented in Switzerland in the late 1950s (introduced commercially around 1958). It was created by two men
Adolph Jüsi: A Swiss researcher who studied eagles. He needed a way to climb ropes to reach nests on cliffs
Walter Marti: A precision mechanic who designed and built the tool for Jüsi
The name “Jumar” is a portmanteau of their last names (JUsi and MARti). Because their device became the global standard for big-wall climbing, the verb “to jumar” (jumaring) became synonymous with ascending a rope, even if using different brands like Petzl or Black Diamond
While the mechanical device is Swiss, the technique of using a friction hitch to move up a rope is older.
Karl Prusik: An Austrian mountaineer and music teacher, he is often credited with inventing the Prusik Knot (published in 1931).
Before mechanical jumars existed, climbers “prusiked” up ropes using two loops of cord. The “sit-stand” rhythm we use today with mechanical jumars is a direct evolution of the sequence Prusik popularized.
Key Takeaway for Your Article
If you want to be historically accurate for you can frame it like this:
“While we call the technique jumaring today—named after the 1958 Swiss mechanical invention by Adolph Jüsi and Walter Marti—the concept was born decades earlier. It was Austrian climber Karl Prusik who first formalized the system of rope ascending in 1931 using friction knots. Modern jumaring is essentially ‘Prusiking’ with high-tech Swiss machinery.
How to jumar a rope?
Once the rope is tight, put your foot in the aider, slide the jumar up, and, while stepping up in the aider, pull the rope through the Grigri. Sit back and weight your harness (held by the Grigri), then slide the jumar back up and repeat
Following an Aid Pitch – Leaving the Belay
Step 1
When the leader confirms that the lead rope is fixed, you can attach yourself to it.
Attach your jumars to the carabiner with your aiders as shown.
Step 2
Pull the catch back on each of your jumars, slot them onto the rope and close the catch.
Step 3
Adjust your upper daisy to about half of its full length.
Step 4
Place your feet on appropriate steps of your aiders, so that when your jumars are close together your feet are level with each other. Generally this will be one foot in your third step, the other in your fourth. Step into your lower aider to pull some of the stretch out of the rope. As you do this, push your upper jumar up the rope.
Then sit back, weighting your upper daisy, while pushing your lower jumar up the rope. Your hands do not need to leave their position on the jumars (using two hands to push one jumar is inefficient). Do this a few times until you’ve pulled all the stretch out of the rope, so you are no longer weighting the belay. This sequence is the basic technique, known as jumaring, that you will use to ascend the rope.
Step 5
Jumars are not full-strength attachment points, so you also need to use a GriGri (or similar) to attach yourself to the rope. Take the slack rope from underneath your jumars and put it through your GriGri as shown. Attach this to your belay loop.
Step 6
While you are attaching yourself to the lead rope, the leader will be setting up the hauling system. When they tell you that the ‘haul rope is ready’, you can reply with ‘releasing haulbag’. Release the haul bag from the belay as described
Step 7
Detach yourself from the belay (but stay tied into the end of the lead rope) and begin cleaning the pitch.
Top Tip
Your top jumar will slide up the rope easily because the rope is tensioned below it (by your lower jumar), but your lower jumar won’t act the same.
To move your lower jumar, you’ll need to pull the catch back slightly with your thumb. This moves the teeth away from the rope without disengaging the catch completely, meaning that it will glide up the rope. When you let go, the catch springs back and locks on the rope. This is a subtle movement which takes a bit of practise to develop.
Jumaring on Slightly Overhanging Terrain
Jumaring on steep ground is hard work, but gets easier with practise. The technique is basically the same as for vertical terrain, but you must synchronise your movements to be efficient. Weight your lower aider while simultaneously pushing your upper jumar up the rope (you’ll need to unweight your foot on the upper one to do this). Then sit back on your upper daisy while pushing the lower jumar up, pulling the catch back slightly to help it slide up the rope. You may need to adjust your upper daisy to a shorter length if you are hanging too low.
You should alternate between resting your weight in your harness (when sitting back on your daisy) and having your weight on your legs (when standing up). You don’t need to pull yourself up with your arms. Make sure the rope feeds through your GriGri as you are jumaring up. Sometimes the weight of the rope will do this for you, but often you’ll need to stop every few meters to pull it through. It’s a good idea to clip the rope to your belay loop every 10 meters or so. This helps to keep the rope from getting stuck around distant flakes when it’s windy, and also acts as an extra back-up.
Jumaring on Slabs
Jumaring on lower-angle terrain is easier. All your weight is on your legs – you don’t need to weight your daisies. But if you need a rest, just sit back and hang on your top daisy. You’ll need to adjust your daisies longer and put your feet one step lower in each aider than you would on steep ground.
Removing Gear when Jumaring
Cleaning Straight-Up Sections
On a perfectly straight-up pitch, you can simply unclip and remove gear.
Don’t slam your jumar right up into a knot or piece of gear as it needs to move up a few millimetres before it can be released.
Cleaning Almost Straight-Up Sections
In many cases the gear will be pulled tight by the rope, making it hard to unclip. In this situation:
– Weight your lower jumar
– Remove your upper jumar from the rope
– Re-attach this jumar to the rope above the gear and weight it
– Now you can more easily remove or unclip the gear
Diagonal Sections
If you use the previous method to remove gear on a diagonal pitch, your lower jumar will get ‘sucked in’ to the gear. To avoid this:
Step 1
Jumar close to the piece.
Step 2
Pull slack through your GriGri and weight it.
Step 3
Remove both jumars (one at a time) and reattach them above the piece.
Step 4
Release rope through your GriGri so that you are weighting the jumars again.
Step 5
Now you can remove the gear.
Traverses and Overhangs
To clean a traverse or a steep overhang, you’ll need to take both of your jumars off the rope and clip your aiders into the gear that the leader placed. Effectively, you are ‘leading on top rope’, belaying yourself with your GriGri.
Simply clip across the pieces, removing the ones behind you as you go. Make sure to keep pulling the slack rope through your GriGri and tie back up knots as you go. If the piece held the leader, then it’ll (probably) hold you too. If it doesn’t hold, then you’ll fall safely onto your GriGri and/or back up knots. If the leader did some hook moves on the traverse, you’ll need to bring some hooks with you to repeat those moves when cleaning.
Cleaning Pendulums and Lowering Out
When you reach the piece which the leader pendulumed or tension traversed from, you can’t remove it or else you’ll swing uncontrollably across the wall. To avoid this, you’ll need to do a lower-out.
You’ll need plenty of slack rope for a lower-out (around three times the diagonal distance of the lower-out). This usually isn’t a problem halfway up a pitch, but if there’s a lower-out near the start of a pitch (or straight off the belay), make sure the leader fixes the rope with enough slack for you to do this.
The following method describes lowering out by passing a bight of rope through a fixed piece, therefore not needing to untie from the end of the rope. For very long lower outs, you may need to untie (described later in this article).
Step 1
Remove your jumars from the rope and clip one of your daisies directly into the lower-out piece. On well-travelled routes this will usually be a bolt or a collection of fixed gear. Your weight will be on this daisy while you’re setting up the lower-out.
Step 2
Pull all the slack rope through your GriGri so the rope is tight to the upper belay.
Step 3
Take the slack rope from below your GriGri and push a bight of it through the ring or carabiner at the lower-out point.
Step 4
Attach the rope to another belay device (such as an ATC) on your belay loop as shown (if you don’t have one, use a munter hitch).
Step 5
Lean into the lower out point and take in all the slack rope through the ATC so that your weight is taken by it.
Step 6
Keeping hold of the brake rope, remove your daisy and any other gear from the lower-out point. Then lower yourself out by letting slack through your ATC.
Step 7
When you have finished lowering, put your jumars back on the rope above you, remove your ATC and pull the bight of rope back through the lower out point. You can continue jumaring the now vertical rope.
Top Tip
If you don’t quite have enough rope, you can jumar up a little after lowering as far as you can. This will give you extra rope to complete the lower-out.
Longer Lower-Outs
The following technique uses half the amount of rope but involves untying from the end. This is useful for very long lower-outs or for lower-outs near the start of a pitch.
Step 1
Follow steps 1 and 2 as described in the previous section and add a back-up knot as shown.
Step 2
Untie from the end of the rope and feed it through the lower-out point.
Step 3
Attach the rope to an ATC (or munter hitch) on your belay loop and pull the slack through so your weight is taken by it.
Step 4
Remove your daisy and lower yourself out.
Step 5
When you’ve finished lowering out, remove your ATC, pull the rope through the lower-out point and tie back into the end.